1. Integration Overview
1.1 Introduction
Sentinel Access is Core Guard Group's integration platform. It connects the security systems your organisation already uses so they work together automatically, instead of needing someone to keep them in step by hand.
This guide covers Sentinel Access's first supported integration: connecting Avigilon Alta Access (your access control system) with Suprema BioStar 2 (your biometric system).
Once connected, Sentinel Access reads the list of people held in Alta Access and keeps BioStar 2 up to date automatically. When someone joins your organisation, they appear in BioStar 2 ready to be enrolled. When someone leaves, their BioStar 2 account is switched off automatically. You do not need to add or remove anyone in both systems by hand.
What this integration does
- Automatically copies your people list from Avigilon Alta Access into Suprema BioStar 2
- Keeps both systems in step as people join, change or leave, checked automatically every few minutes
- Encrypts and protects the login details you give it
- Runs quietly in the background once it is set up, with nothing to click or run day to day
What version 0.9.0 covers today
This first release of Sentinel Access focuses on keeping your people list in step between the two systems. It does not yet issue access cards, and enrolling a face or fingerprint still happens at a BioStar 2 device, with the person present, exactly as with any new BioStar 2 user today. Core Guard Group plans to bring biometric enrolment directly into Sentinel Access in a future release.
1.2 How It Works
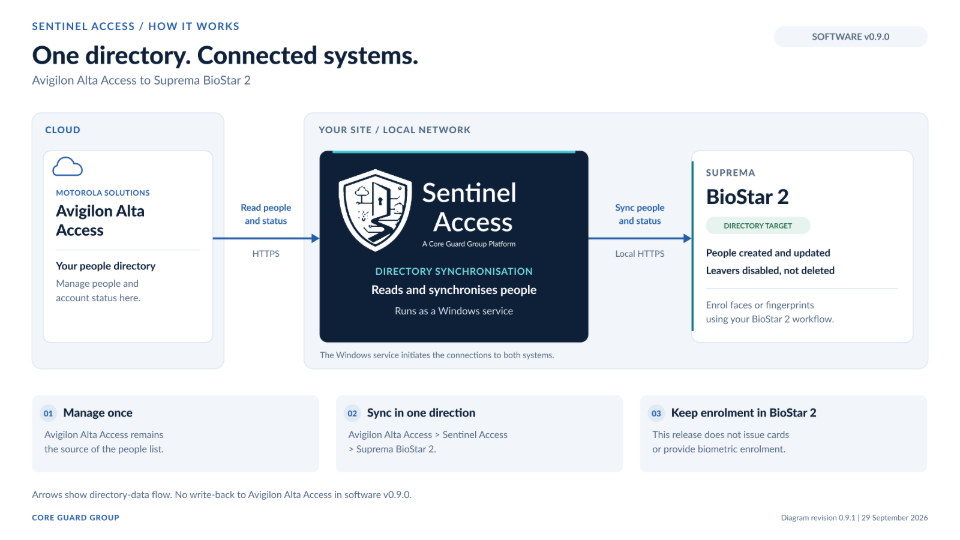
Figure 1. How Sentinel Access connects Avigilon Alta Access and Suprema BioStar 2.
Sentinel Access sits between the two systems and copies information in one direction only, from Alta Access into BioStar 2. It never writes anything back into Alta Access, and it never changes anything about how your doors themselves work.
2. Before You Start
2.1 What You Will Need
- A Windows computer at your site to install Sentinel Access on (Windows 10 or later), able to reach your Avigilon Alta Access account over the internet and your Suprema BioStar 2 server over your local network
- Enough administrator access in Avigilon Alta Access to create a new custom role. You will use this once, in Section 2.2, to set up a dedicated, view-only account for Sentinel Access itself
- Admin access to your Suprema BioStar 2 server, along with its address and port
- About 15 to 20 minutes
Note: Complete Sections 2.2 and 2.3 before installing Sentinel Access. Having both sets of details ready makes the setup in Section 4 a five-minute job instead of a stop-and-search one.
2.2 Setting Up Your Avigilon Alta Access Account
Sentinel Access needs its own login to Alta Access, separate from any person's own login. This keeps a clean record of what Sentinel Access has done, and means the connection keeps working even if a staff member's own password changes later.
Step 1: Create a role for Sentinel Access
In Alta Access Control Center, create a new custom role. (A role controls what an account can do; it is different from a door access group, which controls which doors someone can open.)
1. In the left-hand menu, click Users, then click Roles, then click the + button in the top right to start a new role.
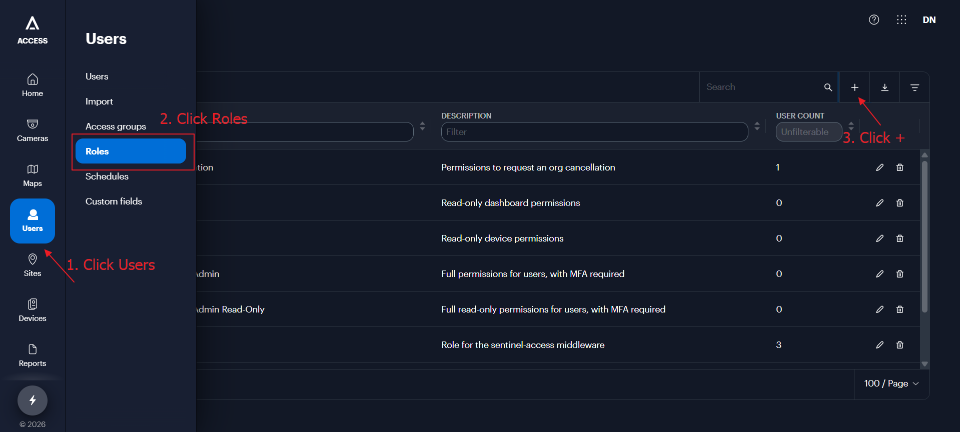
Users → Roles → + in Alta Access Control Center.
2. Enter a Name for the role, such as “Sentinel Sync”, and a short Description such as “Role for the Sentinel Access middleware”.
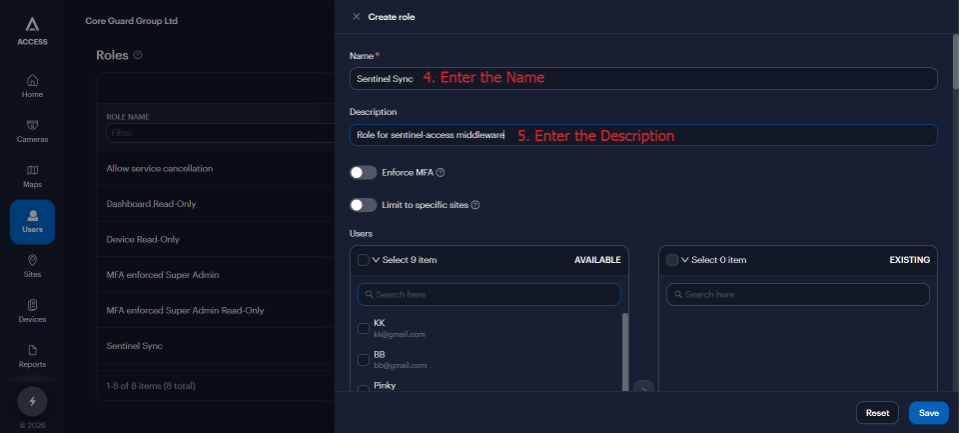
Name and Description fields on the Create role screen.
3. Scroll down to the Users permissions group and switch on both Read and Write for the Users permission. Leave Roles switched off.
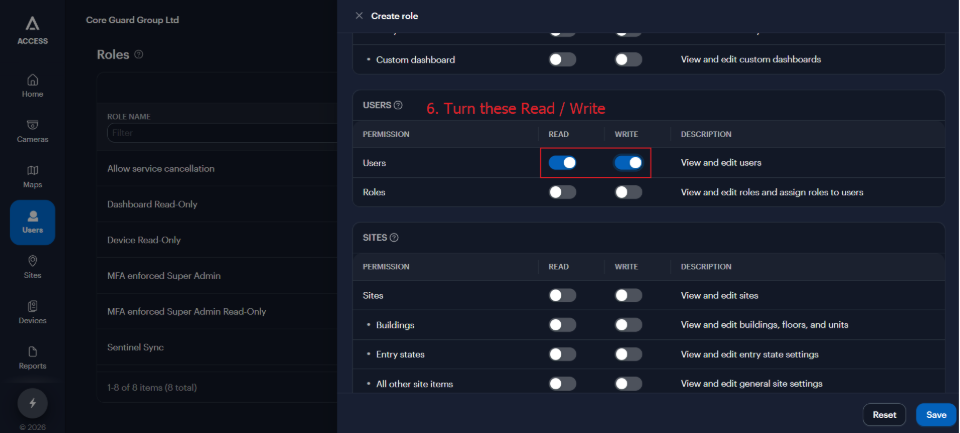
Users permission switched to Read and Write.
4. Scroll down further to the Reports permissions group and switch on both Read and Write for Portal audit report. Leave every other permission, including hardware, doors and administrator management, switched off. Click Save to create the role.
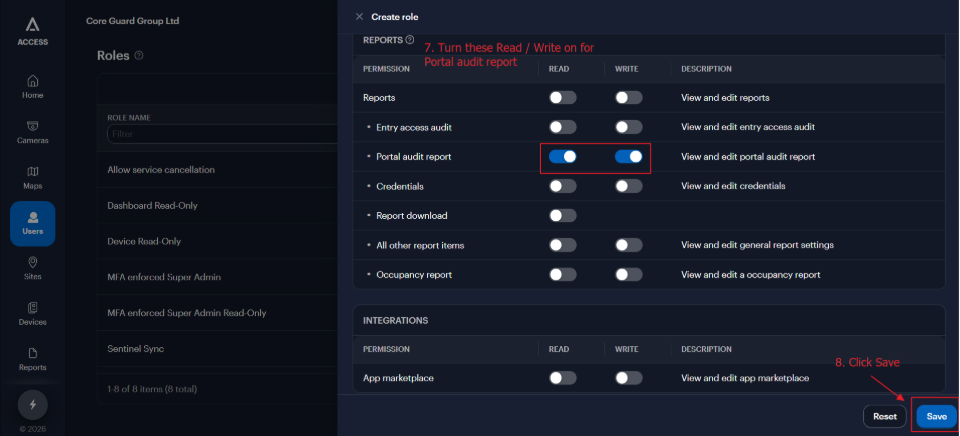
Portal audit report permission switched to Read and Write, then Save.
- Leave multi-factor authentication switched off for this role, since Sentinel Access must be able to sign in on its own, without anyone available to enter a verification code
Note: Both permissions need Read and Write, not just Read. Sentinel Access uses Read access today to keep BioStar 2 in step with Alta Access. Write access is needed for an upcoming feature that adds a person to Alta Access directly from Sentinel Access, who then syncs on to BioStar 2 the same way as anyone else. Users alone is not enough: Alta Access removes a deleted person without a trace, so the audit report is the only way Sentinel Access can notice that someone has left.
Step 2: Create the account
In Alta Access Control Center, add a new user for Sentinel Access:
1. In the left-hand menu, click Users, then click Users again in the submenu, then click the + button in the top right to start a new user.
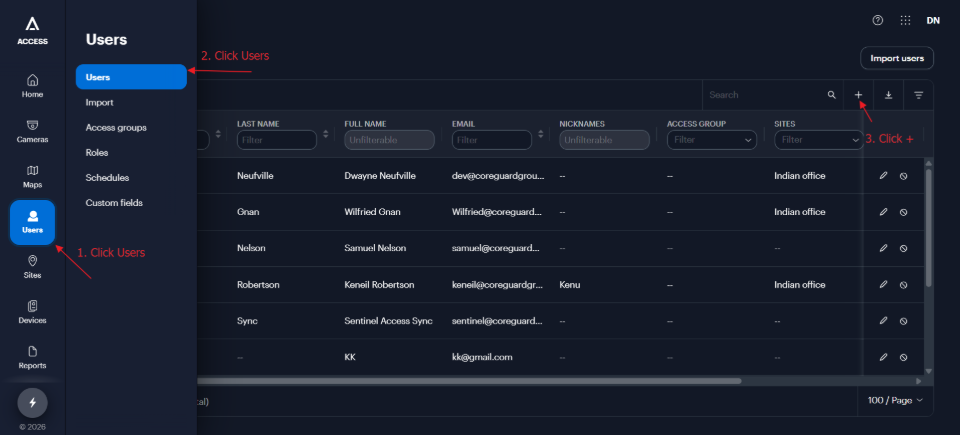
Users → Users → + in Alta Access Control Center.
2. Enter an Email address your organisation controls and can check, for example dev@coreguardgroup.com. It needs to receive at least one email, since that is how its password gets set. Enter a First name and Last name that are clearly not a real person, such as “Sentinel” and “Access”.
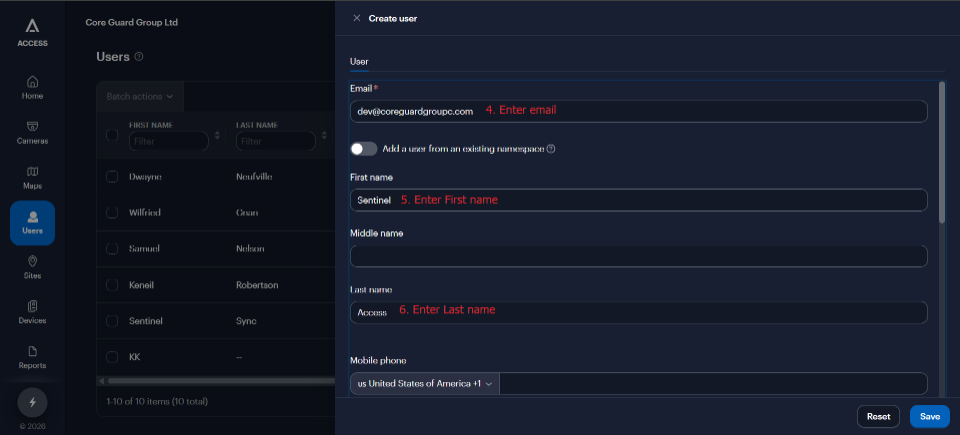
Email, First name and Last name fields on the Create user panel.
3. Scroll down and switch on Portal access so the account is able to sign in, then select the Sentinel Sync role you created in Step 1, and no other role. Click Save.
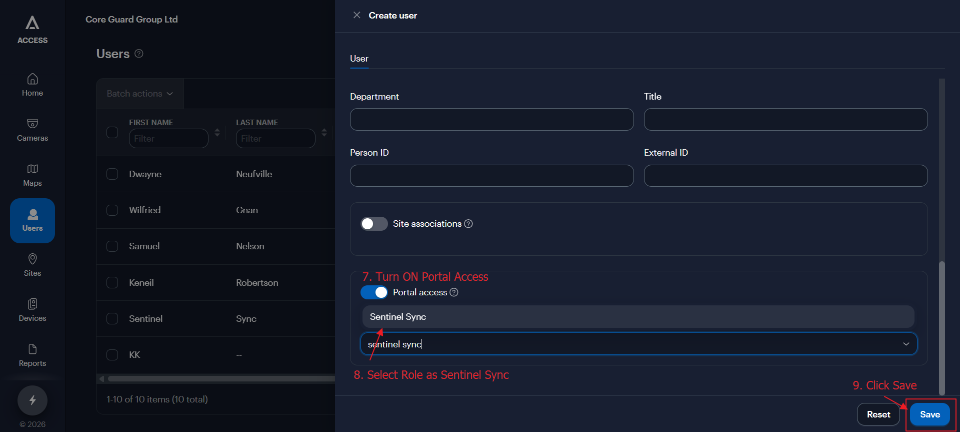
Portal access switched on, Sentinel Sync role selected, then Save.
- Leave multi-factor authentication off
- Do not add it to any door access group; it never needs to open a door
Note: If your organisation signs in through a company login system such as Okta or Microsoft Entra, this account still has to be created directly inside Alta Access, not through that system. Avigilon's connection does not accept logins created the other way.
Step 3: Set its password
There is no field in Control Center for typing a password in on another account's behalf. Instead, once you save the new account, Alta Access emails that address a link inviting it to set its own password.
1. Go to that email address's inbox and open the invite email from Avigilon Alta, then click click here to set your initial password. This link expires after 7 days.
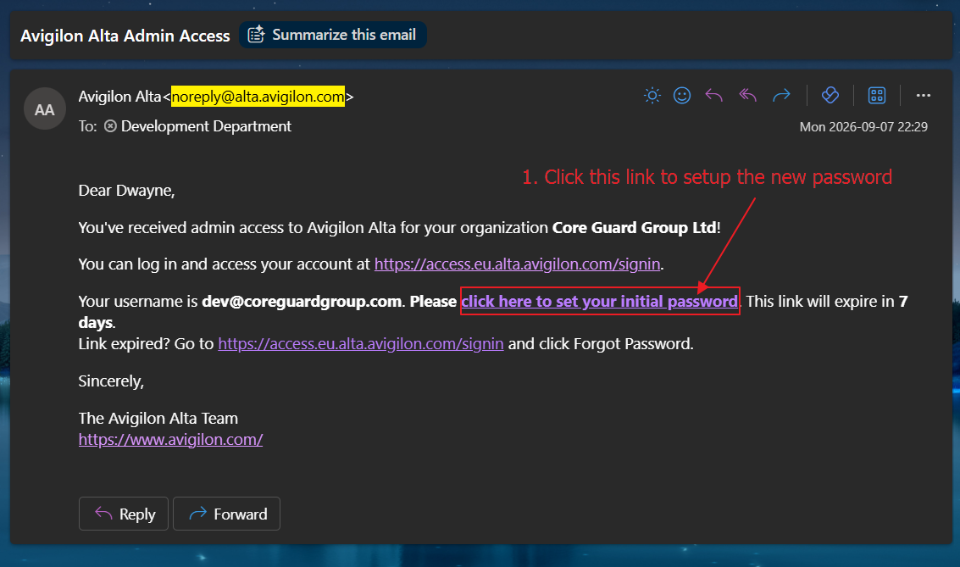
Invite email from Avigilon Alta, with the password-setup link.
2. Enter a long password under New password, enter it again under Confirm password, and click Set password. Store it somewhere secure, such as a password manager, since it cannot be viewed again afterwards.
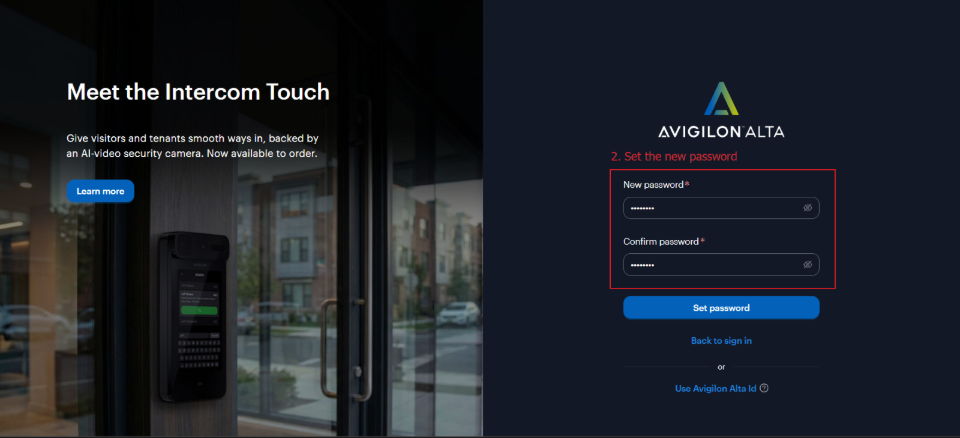
New password and Confirm password fields on the Avigilon Alta password screen.
- If the email never arrives, go to the Alta Access sign-in page, click “Forgot password?”, and enter the account's email address to request a fresh link
Step 4: Check it works
Sign in to Alta Access Control Center as the new account. A private or incognito browser window is a convenient way to do this without signing yourself out. Confirm that you can view and edit people and the audit report, that you cannot reach hardware and door settings, and that you are not asked for a verification code.
Keep the email address and password to hand. You will enter them into Sentinel Access in Section 4.2.
2.3 Setting Up Your Suprema BioStar 2 Server
Sentinel Access connects to BioStar 2 the same way an administrator does from a browser. Before continuing, work through the following:
Note: If BioStar 2 is not installed yet, download it from Suprema's own Download Center at download.supremainc.com/download-center/pages/login.asp (a free Suprema account is needed to sign in there), then install it before continuing.
Step 1: Confirm BioStar 2 is running
- BioStar 2 is installed and running (version 2.9.8 or later)
1. Open a browser on any computer on the same network and go to the server's address, for example https://192.168.1.50. Confirm the BioStar 2 sign-in screen loads.
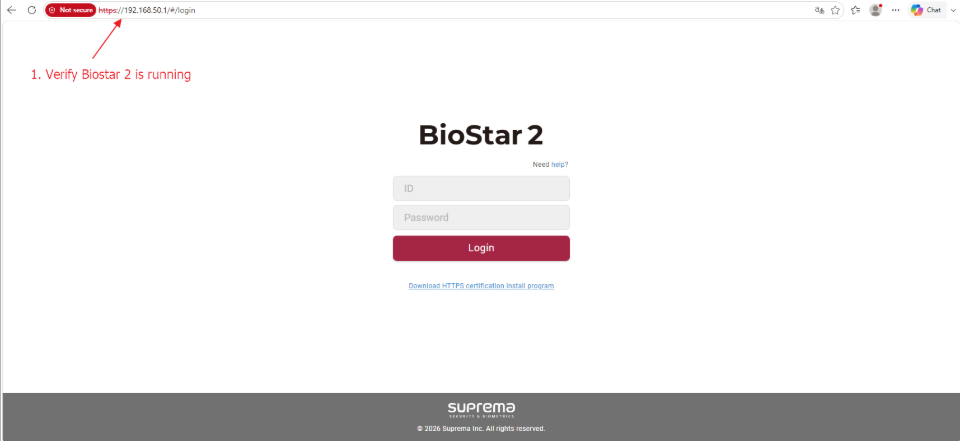
BioStar 2 sign-in screen, confirming the server is running.
- If the page does not load at all, see “The BioStar 2 sign-in page won't load at all” in Section 6
Step 2: Check its services, address and port
On the BioStar 2 server itself (not from a browser), confirm its background services and the port it uses:
1. Search for BioStar 2 Setting in the Windows Start menu and open it.
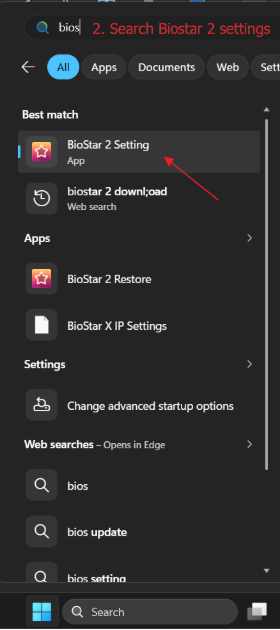
Searching for the BioStar 2 Setting application in the Windows Start menu.
2. Under Service Status, confirm Core Web Server, BioStar 2, and T&A Web Server all show Running. Under Web Server Configuration, note the HTTPS Port (443 by default). Together with the address from Step 1, this is the server address and port Sentinel Access will connect to.
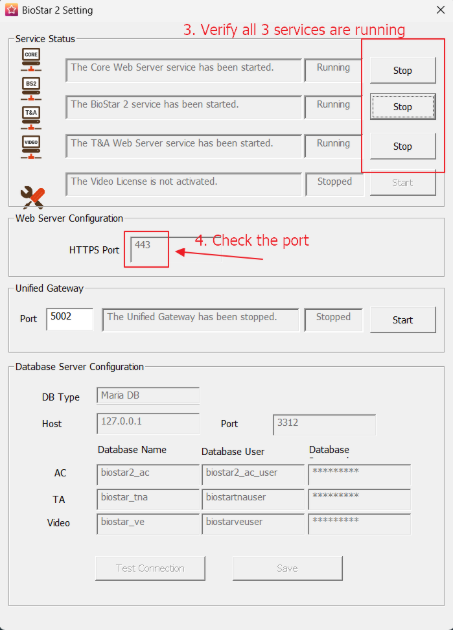
BioStar 2 Setting application, showing service status and the HTTPS port.
- The Video License row showing “Stopped” is expected and does not affect the Alta Access integration
Step 3: Confirm you have an admin login
- You have an admin username and password for it
1. At the address from Step 1, sign in using an admin username and password. Confirm the login succeeds.
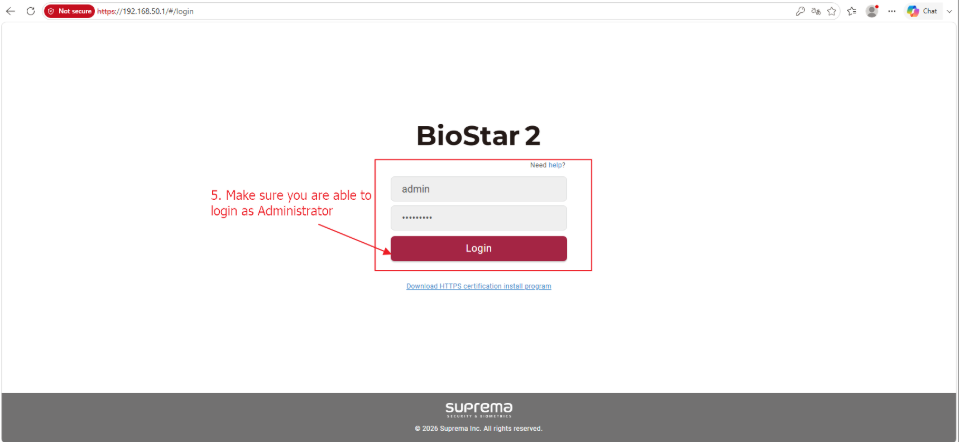
Signing in to BioStar 2 as an administrator.
BioStar 2 protects its connection with a security certificate it creates for itself, rather than one issued by an outside authority. The first time Sentinel Access connects to it, it will show you a short code taken from that certificate and ask you to confirm it. This is a one-time check described in full in Section 4.3.
3. Installing Sentinel Access
3.1 Download and Run the Installer
1. Locate the Sentinel Access installer file your Core Guard Group contact provided (named something like SentinelAccessSetup-0.9.0.exe) in your Downloads folder, and double-click it to run it.
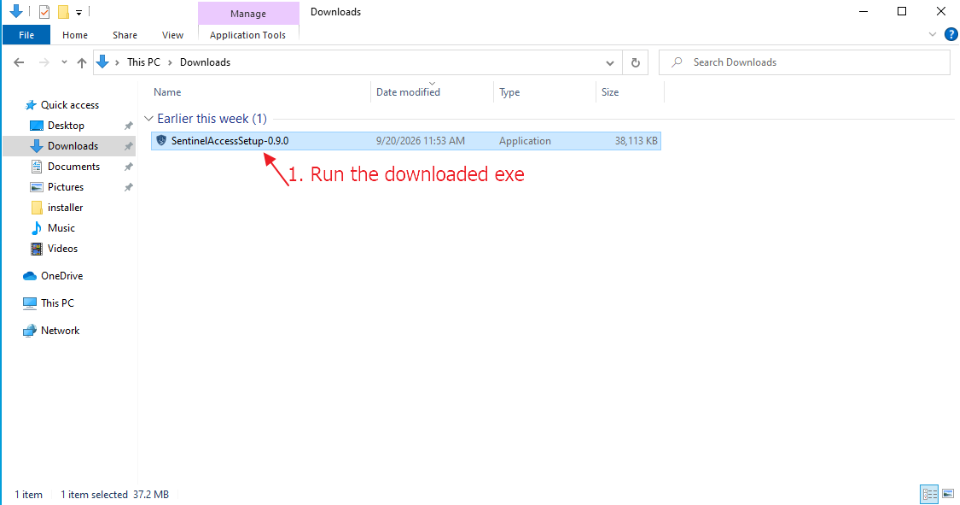
The Sentinel Access installer in a Downloads folder.
2. Windows may show a blue screen titled “Windows protected your PC.” This is expected and only appears because Sentinel Access is a new release. Click More info, then click Run anyway.
3. On the “Welcome to the Sentinel Access Setup Wizard” screen, click Next.
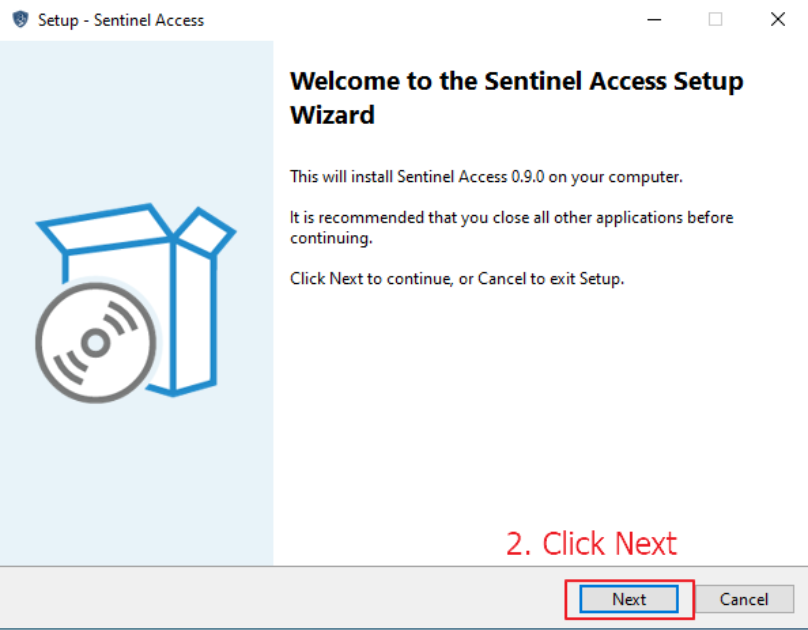
Welcome screen of the Sentinel Access Setup Wizard.
4. On “Select Destination Location,” keep the suggested folder (C:\Program Files\Sentinel Access) unless your IT administrator has asked you to install somewhere else, then click Next.
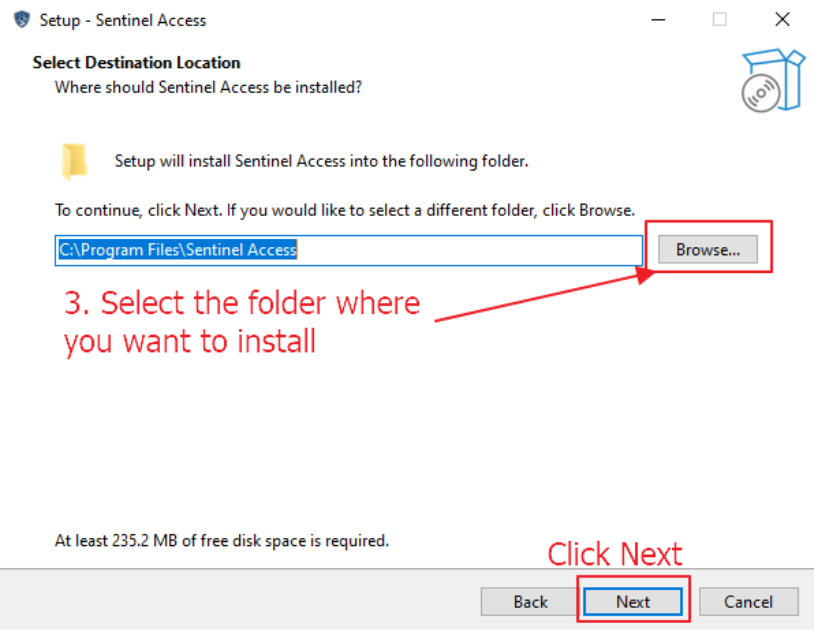
Select Destination Location screen, showing the suggested install folder.
5. On “Console Port,” keep the suggested port (3000) unless your Core Guard Group contact told you to use a different one, then click Next.
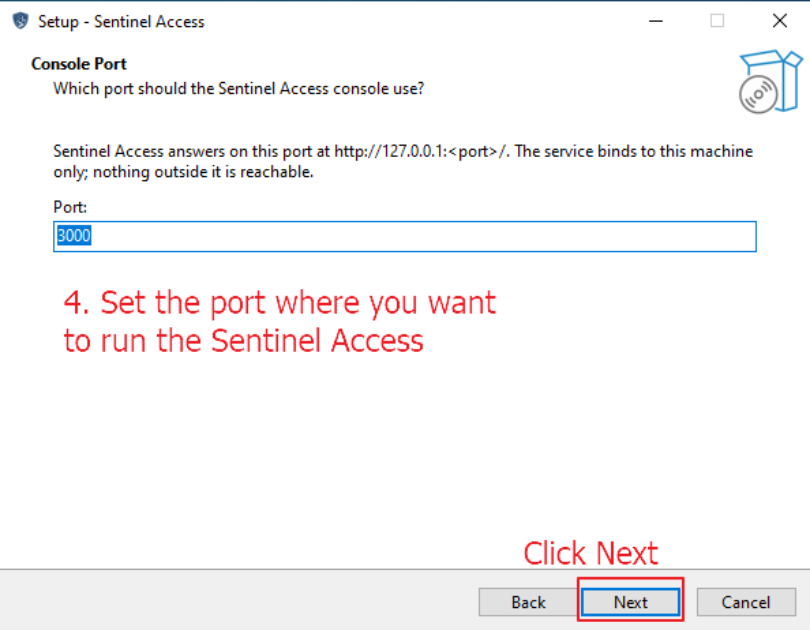
Console Port screen, showing the suggested port.
6. On “Select Additional Tasks,” make sure “Start the Sentinel Access service when setup finishes” stays ticked, its default state, then click Next.
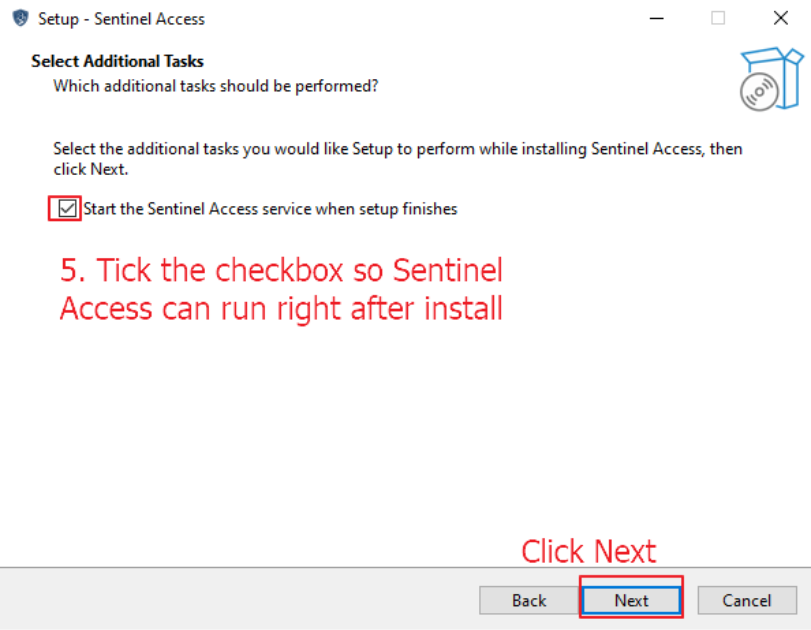
Select Additional Tasks screen, with the start-service checkbox ticked.
7. On “Ready to Install,” review the destination location and additional tasks shown, then click Install.
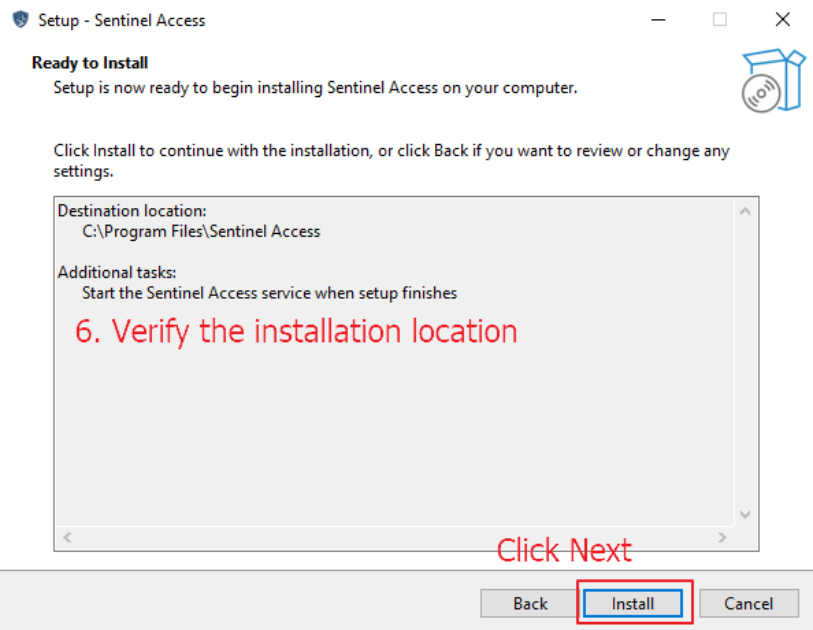
Ready to Install screen, summarizing the choices made so far.
8. Wait while Setup installs Sentinel Access. This takes a minute or two.
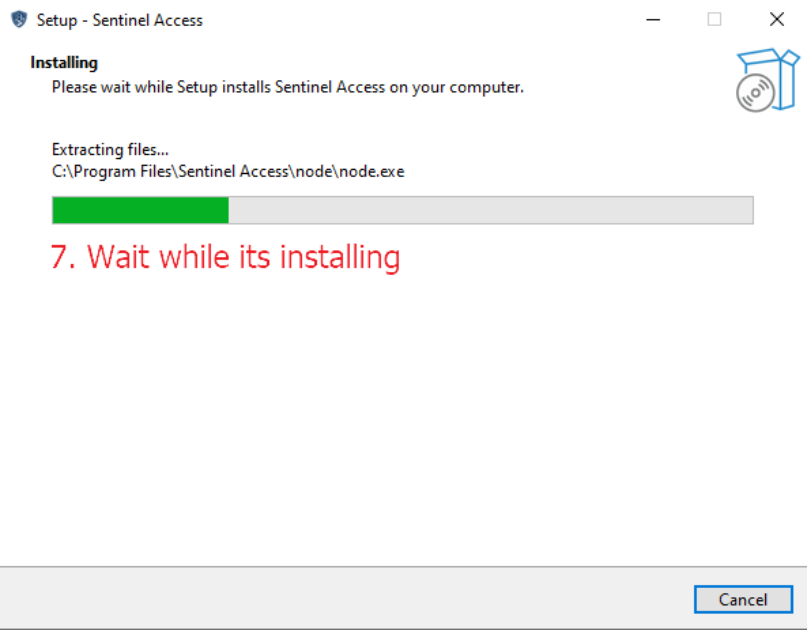
Installing screen, showing progress.
Sentinel Access installs itself as a Windows service, meaning it starts automatically and keeps running quietly in the background, even after the computer restarts.
3.2 Opening Sentinel Access
Once Setup finishes, Sentinel Access opens automatically in your web browser and takes you straight into setup, covered next in Section 4.
Note: Sentinel Access only opens on the computer it is installed on; it cannot be reached from other computers on your network. This is intentional and keeps the login details it stores safe.
Setup also creates two shortcuts on the Start menu: Sentinel Access, which reopens the console any time after your first setup, and Sentinel Access Operator Guide, which is technical reference material for your IT administrator.
If the browser window does not open on its own, or you close it, you can open Sentinel Access again at any time:
1. Click the Start button (or press the Windows key) and type Sentinel Access.
2. Select the Sentinel Access result.
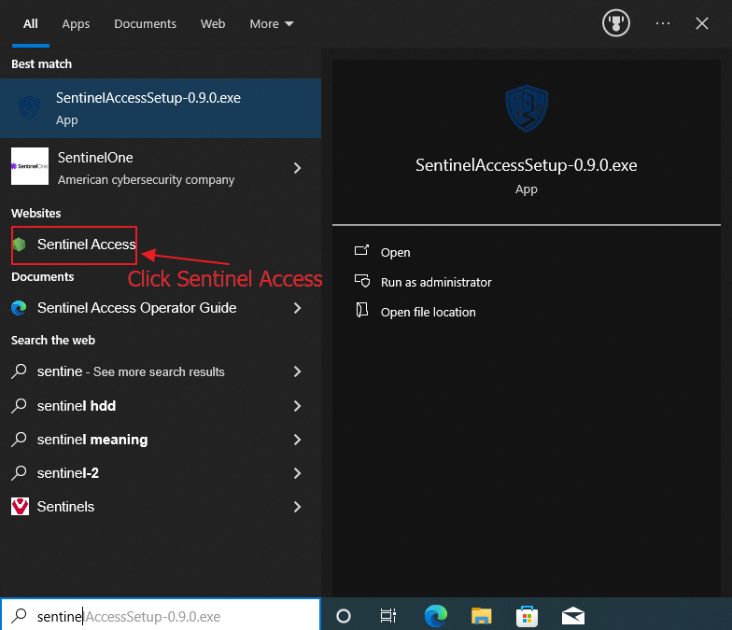
Opening Sentinel Access from the Windows Start menu search.
4. Connecting Your Systems
This section walks through the setup screens Sentinel Access shows the first time you open it. Have the Alta Access details from Section 2.2 and the BioStar 2 details from Section 2.3 ready before you begin.
A stepper across the top of every screen in this section (Select systems → Connect credentials → Sync directory → Go to console) shows where you are in the setup.
4.1 Select Your Systems
The first screen asks: “Which systems do you want to connect?”
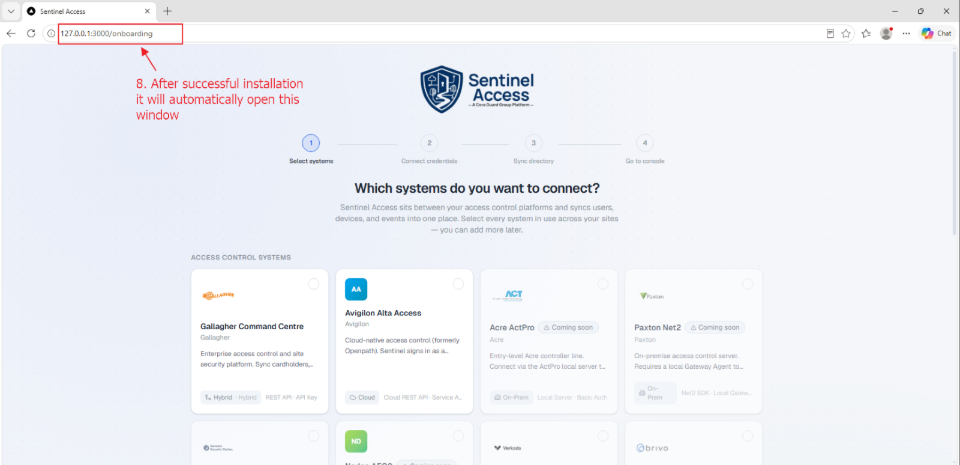
The onboarding screen, opened automatically after installation finishes.
1. Under Access Control Systems, click Avigilon Alta Access. Under Biometric & Device Platforms, click Suprema BioStar 2. A blue tick appears on a card once it is selected.
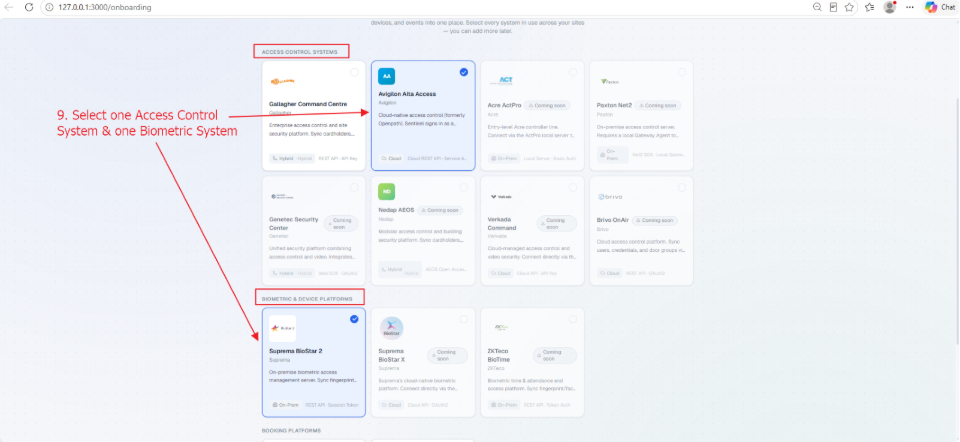
Avigilon Alta Access and Suprema BioStar 2 both selected on the “Select systems” screen.
2. Scroll down to confirm the footer reads “2 systems selected,” then click Continue.
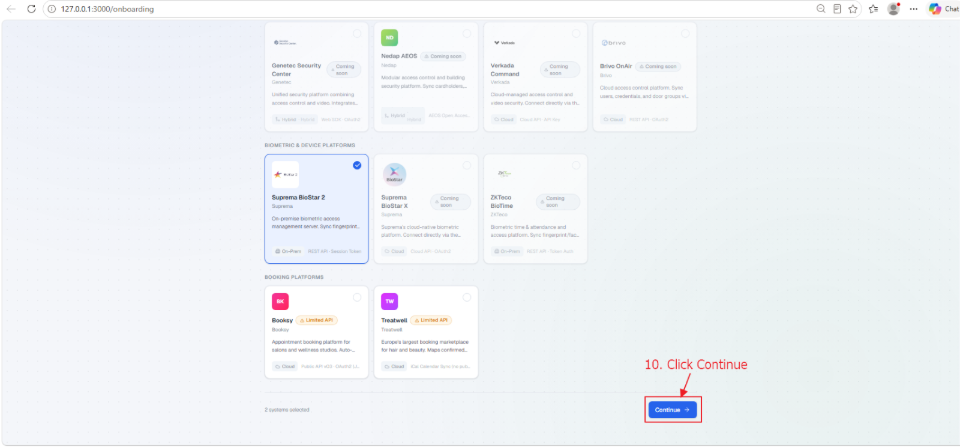
Both systems selected, with the Continue button ready at the bottom of the screen.
4.2 Connect Avigilon Alta Access
The next screen, “Connect your credentials,” opens on the Avigilon Alta Access tab and asks for the service account you created in Section 2.2.
1. Open the Region dropdown and choose the region matching the address you use to sign in to Alta Access Control Center, either United States (control.openpath.com) or Europe (control.eu.openpath.com).
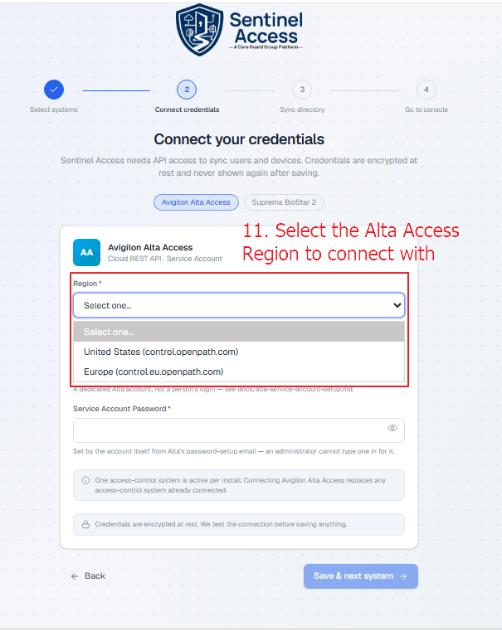
The Region dropdown open on the Avigilon Alta Access tab.
2. Enter the Service Account Email and Service Account Password for the account you created in Section 2.2, then click Save & next system.
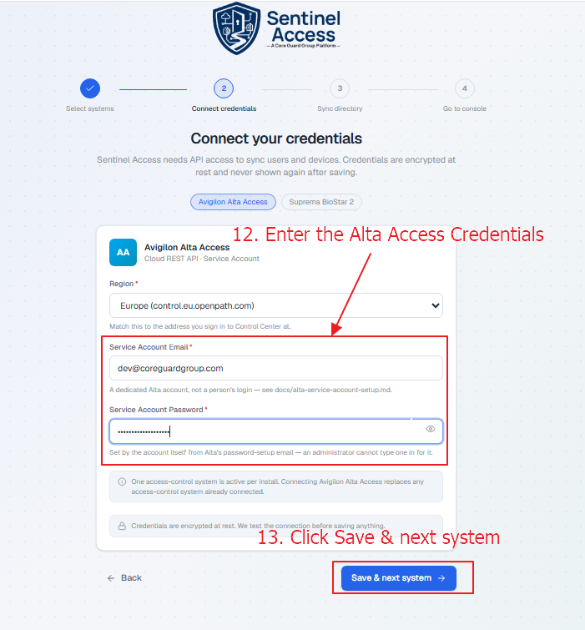
Avigilon Alta Access credentials entered, ready to save.
Field | What to enter |
Region | United States or Europe, matching the address you use to sign in to Alta Access Control Center |
Service Account Email | The dedicated account's email address, from Section 2.2, Step 2 |
Service Account Password | The password you set for it in Section 2.2, Step 3 |
Note: One access-control system is active per install. Connecting Avigilon Alta Access replaces any access-control system already connected. If Sentinel Access cannot connect, it shows a short message explaining why, for example if a password does not match. See Section 6, Troubleshooting.
4.3 Connect Suprema BioStar 2
The screen now shows the Suprema BioStar 2 tab. Enter the server details you confirmed in Section 2.3:
1. Enter the BioStar 2 Server URL (the address and port from Section 2.3, Step 2, for example https://192.168.1.50:443), your Admin Username, and your Admin Password from Section 2.3, Step 3.
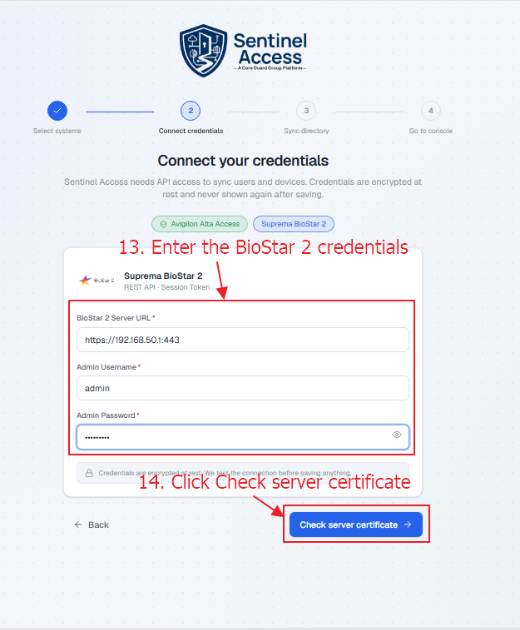
Suprema BioStar 2 server URL and admin credentials entered.
Field | What to enter |
BioStar 2 Server URL | Your server's web address, for example https://192.168.1.50:443, from Section 2.3, Step 2 |
Admin Username | Your BioStar 2 admin username, from Section 2.3, Step 3 |
Admin Password | Your BioStar 2 admin password, from Section 2.3, Step 3 |
2. Click Check server certificate.
Sentinel Access shows a “Confirm this server's certificate” panel with a long code underneath, the same one-time check described in Section 2.3. This confirms you are connecting to your own BioStar 2 server, not an impostor on the network. If you recognise the code as belonging to your BioStar 2 server, ask your IT administrator to double check it if you are unsure.
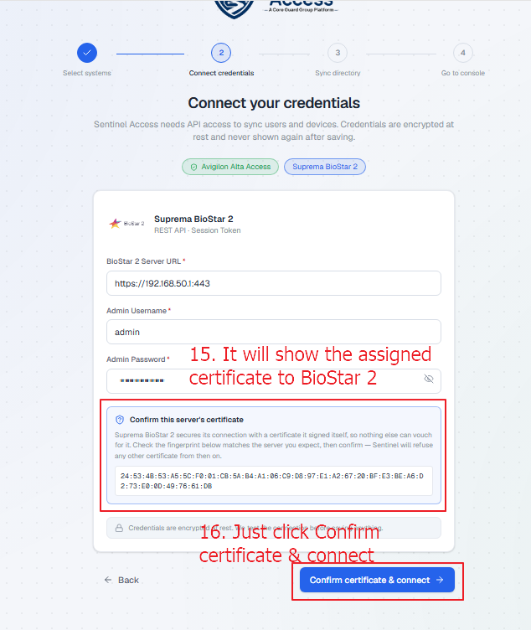
The certificate fingerprint shown before confirming the BioStar 2 connection.
3. Click Confirm certificate & connect.
4.4 First Sync
Sentinel Access now reads everyone from Alta Access and creates them in BioStar 2. This screen shows a live count of People synced and Failed, and may take a few minutes depending on how many people are in your organisation.
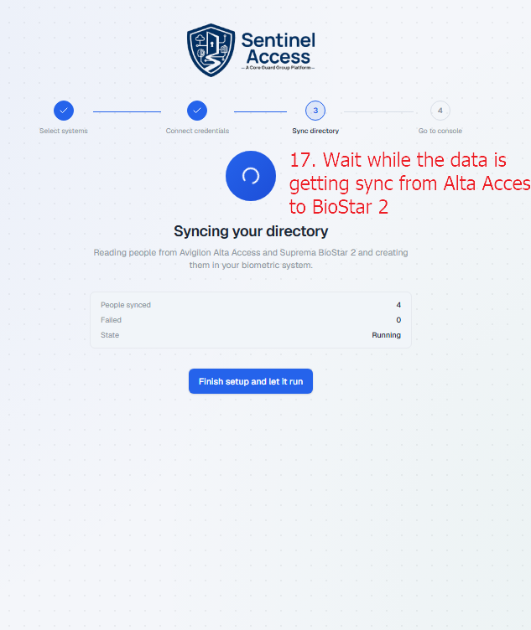
The “Syncing your directory” screen, showing live People synced and Failed counts.
You do not need to keep this window open. If you close your browser or the computer restarts, Sentinel Access continues where it left off in the background.
If any people could not be created, they are listed here by name with a short reason. Sentinel Access keeps retrying them automatically on its own, without any action from you.
4.5 Setup Complete
Once the first sync finishes, you will see “You're all set.” This confirms how many people were synced and shows both connected systems. Click Go to dashboard to finish.
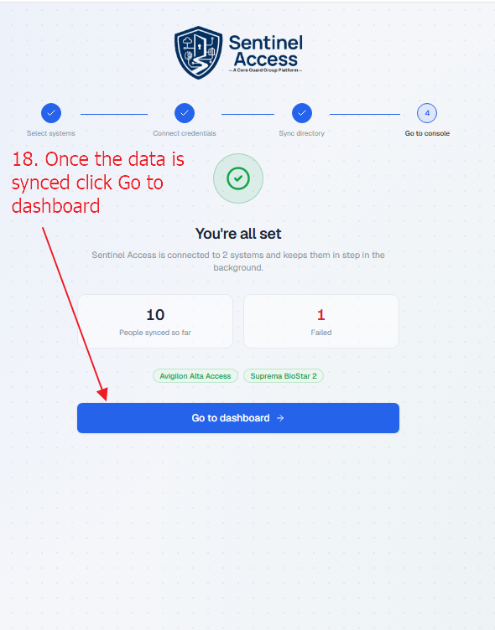
The “You're all set” screen, confirming both systems are connected.
From here, Sentinel Access takes you straight to its dashboard, where both connected systems appear alongside a live overview of your synced people and devices.
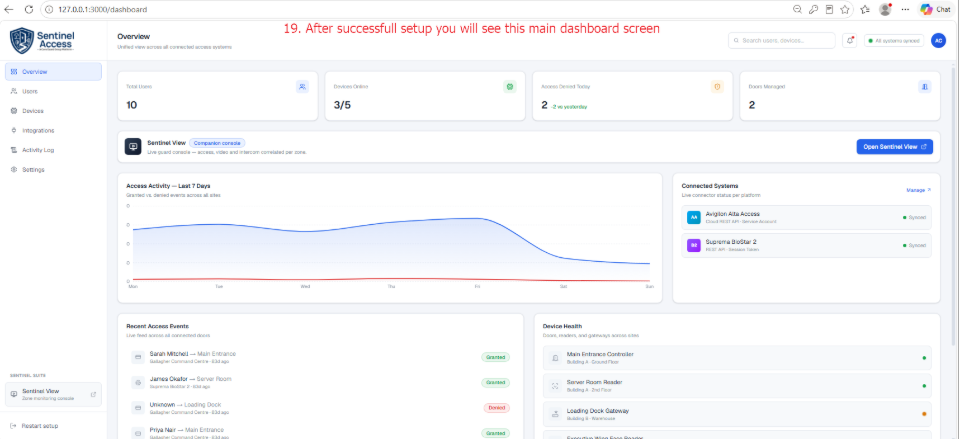
The Sentinel Access dashboard immediately after setup, showing both connected systems.
5. Everyday Use
5.1 How Syncing Works
Once set up, Sentinel Access checks Alta Access automatically, roughly once a minute, and handles the following without anyone needing to do anything:
- A new person in Alta Access is created in BioStar 2, ready to be enrolled
- A person's details changed in Alta Access are updated in BioStar 2
- A person suspended or deactivated in Alta Access is switched off in BioStar 2
- A person permanently deleted in Alta Access is also deleted from BioStar 2
Note: A person who is only suspended or deactivated in Alta Access is switched off in BioStar 2, not deleted. This protects their already-enrolled face or fingerprint, and if they are reinstated in Alta Access they are switched back on automatically with their original enrolment still in place. Only a permanent deletion in Alta Access deletes the person from BioStar 2, and that also removes their enrolled face or fingerprint. It cannot be undone, and they would need to enrol again.
5.2 Finding a Person
From the Sentinel Access dashboard, click Users in the left-hand menu to see everyone who has been synced from Alta Access.
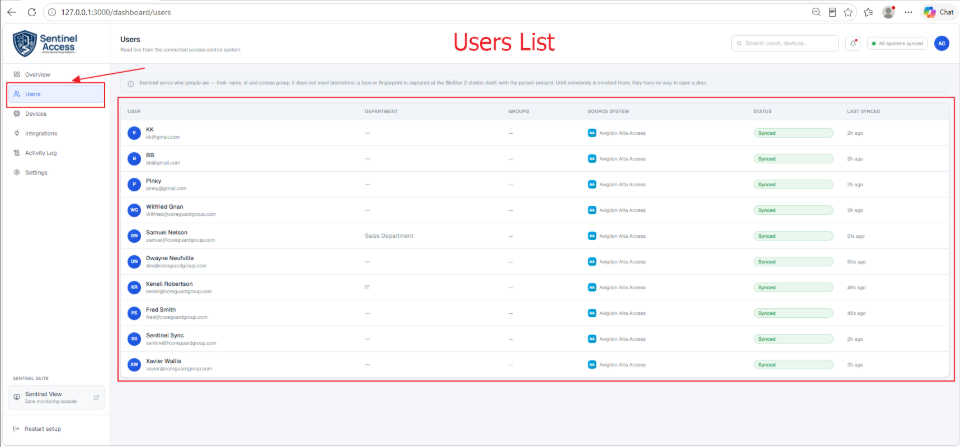
The Users page, listing everyone synced from Avigilon Alta Access and their current status.
Each row shows the person's department and groups where Alta Access provides them, which system they were synced from, their current status, and when they were last synced.
5.3 Updating a Connection Later
If your BioStar 2 server's address changes, or you need to re-enter your Alta Access details:
1. Open Integrations from the dashboard.
2. Find the system you want to update and click Configure.
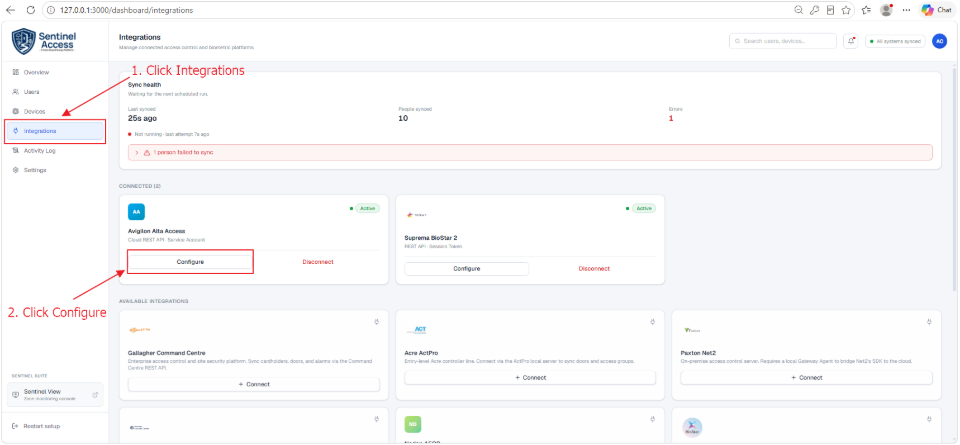
The Integrations page: open Integrations from the left-hand menu, then click Configure on the system you want to update.
3. You are taken back through the same screen described in Section 4, where you can enter the new details.
6. Troubleshooting
“Incorrect email or password” when connecting Alta Access
Work through these in order:
- Check the account was created directly inside Alta Access, not through a company login system such as Okta or Microsoft Entra (Section 2.2, Step 2)
- Check the account has finished setting its password (Section 2.2, Step 3). An account that has never signed in is rejected in exactly the same way as a wrong password
- Check you picked the matching Region. A European organisation's password is rejected on the United States option, and the other way round
No password email ever arrives for the Alta Access account
Check the spam or junk folder first. If nothing arrives, go to the Alta Access sign-in page and click Forgot password?, then enter the service account's email address again.
Sentinel Access asks for a verification code when connecting Alta Access
Multi-factor authentication is still switched on for the account. Switch it off for this account only; it is designed to sign in automatically, with nobody available to type in a code.
Sentinel Access says the account is missing permissions
Return to the role from Section 2.2, Step 1, and check that both Users and Portal audit report have both Read and Write switched on.
The BioStar 2 sign-in page won't load at all
This points to a problem with the BioStar 2 server itself, rather than Sentinel Access. Suprema's own support article covers the common causes and fixes: support.supremainc.com/en/support/solutions/articles/24000044784--biostar-2-can-t-access-biostar-2-login-page.
“Could not connect. Check your credentials.” when connecting BioStar 2
Check that:
- The server address is typed correctly, including https:// at the start
- BioStar 2 is running and reachable from the computer Sentinel Access is installed on
- The admin username and password are correct
The certificate code looks unfamiliar
If your BioStar 2 server's certificate has recently changed, for example after reinstalling BioStar 2, the code shown will differ from before. Confirm with your IT administrator that you are connecting to the correct server before continuing.
Some people show as “Failed” after the first sync
Sentinel Access automatically retries anyone who did not sync successfully on its next check, without any action needed from you. If the same people keep failing, check their record in Alta Access for anything unusual, such as a missing required field, or ask your Core Guard Group contact for help.
7. Uninstalling Sentinel Access
1. Open Windows Settings → Apps → Installed apps.
2. Find Sentinel Access in the list and select Uninstall.
3. Confirm the removal when prompted.
Note: Uninstalling removes Sentinel Access and everything it has stored, including your saved connection details. It does not change anything inside Alta Access or BioStar 2 themselves; both continue to work exactly as they did before.
8. Getting Help
If you run into something this guide does not cover, contact Core Guard Group support:
Email: support@coreguardgroup.com
Phone (UK): 0800 368 9143
Web: www.coreguardgroup.com
Core Guard Group Ltd
Suite 742, JQ Modern, 120 Vyse Street, Birmingham, B18 6NF, UK
Tel: 0800 368 9143 | Email: info@coreguardgroup.com
www.coreguardgroup.com
© 2026 Core Guard Group Ltd. Sentinel Access and identifying product names herein are trademarks of Core Guard Group Ltd.
Product appearance, build status and specifications are subject to change without notice.
Was this article helpful?
That’s Great!
Thank you for your feedback
Sorry! We couldn't be helpful
Thank you for your feedback
Feedback sent
We appreciate your effort and will try to fix the article